One of the most commonly used command when troubleshooting a switch or router is the "Show Run" command. It gives you an insight into the currently running configuration.
Sometimes, this command yields so much output one would be overwhelm with the amount of text on the screen and have to keep pressing the space key to scroll down to see more information.
Well, if you know what you are looking for then you could add a command prefix " begin keyword" and it'll start showing the configuration from that where the keyword occurs.
SwitchA# Show runn | begin spanning-tree
In the example above, the switch will show the current configuration from the line where it finds the first occurrence of the word "spanning-tree".
Using this command can really save you all the trouble of spacing through all the text only to find that you go too fast and miss the relevant information and have to scroll back to look for it.
Monday, July 16, 2007


Funky Name
 I had a little time to spare and wanted to have some fun to relieve the stress so I created a little application that generate some funky names based on the user's input.
The name generation logic is based on a children's book, Captain Underpants And the Perilous Plot Professor Poopypants, by Dave Pilkey, in which the evil Professor forces everyone to assume new names...
The program uses some simple one dimensional arrays and use the user's input to index into the arrays and generate the new name. It also makes use of the one click deployment option.
Pretty funny. Give it a try.
The program can be downloaded from http://www.meshflowers.com/FunkyNames/
Tuesday, July 3, 2007
Reading XML File Using XMLDocument Object
In the previous blog, I discussed how to read XML file using XMLTextReader object of the System.XML namespace. In the same namespace, we also have XMLDocument which can also be used to read XML files.
You can use the Load method to read an XML file and process the elements using XPath selection if you know the structure of the XML document as follow:
Dim myXmlDoc as New XmlDocument
Dim myNode as XmlNode
myXmlDoc.Load("Cars.xml")
myNode = myXmlDoc.SelectSingleNode("/car/honda")
myTextBox.Text = myNode.InnerXml & vbCrLf
The XmlNode object provides the NextSibling method which can be used to move to the next element or node.
myNode = myNode.NextSibling
myTextBox.Text &= myNode.InnerXml
Now that works fine if you know the the structure of the XML document. If you don't know the structure, you can navigate through the document using FirstChild and NextSibling methods.
myNode = myXmlDoc.FirstChild
While myNode.NodeType <> XmlNodeType.Element And Not myNode Is Nothing
myNode = myNode.NextSibling
End While
myTextBox.Text = myNode.InnerXml
 This will dump everything in that node to the textbox including the element names and attributes.
It's not possible to cover all the methods and properties of the XMLDocument and XMLNode in a short blog, but I hope this will get you going.
Further reading should be done on the following topics: XMLDocument, XMLNode, XMLAttribute, FirstChild, HasChildNodes, InnerText, InnerXML...
Download the sample project here.
You can use the Load method to read an XML file and process the elements using XPath selection if you know the structure of the XML document as follow:
Dim myXmlDoc as New XmlDocument
Dim myNode as XmlNode
myXmlDoc.Load("Cars.xml")
myNode = myXmlDoc.SelectSingleNode("/car/honda")
myTextBox.Text = myNode.InnerXml & vbCrLf
The XmlNode object provides the NextSibling method which can be used to move to the next element or node.
myNode = myNode.NextSibling
myTextBox.Text &= myNode.InnerXml
Now that works fine if you know the the structure of the XML document. If you don't know the structure, you can navigate through the document using FirstChild and NextSibling methods.
myNode = myXmlDoc.FirstChild
While myNode.NodeType <> XmlNodeType.Element And Not myNode Is Nothing
myNode = myNode.NextSibling
End While
myTextBox.Text = myNode.InnerXml
 This will dump everything in that node to the textbox including the element names and attributes.
It's not possible to cover all the methods and properties of the XMLDocument and XMLNode in a short blog, but I hope this will get you going.
Further reading should be done on the following topics: XMLDocument, XMLNode, XMLAttribute, FirstChild, HasChildNodes, InnerText, InnerXML...
Download the sample project here.
Friday, June 29, 2007
Reading XML File Using XMLTextReader
System.XML namespace provides us with the XMLTextReader class which we could use to read and process XML files.
The most commonly used attributes are .Name and .Value which returns information of about the elements and their associated information.
 MoveToNextAttribute method is used to navigate to the next element. The project below uses an OpenFileDialog box to get the XML file which is then passed to XMLTextReader object and open it. Then the Read method is called to read in and processed the entire XML file and put its content into a textbox.
In my opinion, reading XML this way is rather confusing. I like reading XML file using XMLDocument object better as it’s very simple and gives you a much clearer view of the whole process.
This sample project can be downloaded here.
The most commonly used attributes are .Name and .Value which returns information of about the elements and their associated information.
 MoveToNextAttribute method is used to navigate to the next element. The project below uses an OpenFileDialog box to get the XML file which is then passed to XMLTextReader object and open it. Then the Read method is called to read in and processed the entire XML file and put its content into a textbox.
In my opinion, reading XML this way is rather confusing. I like reading XML file using XMLDocument object better as it’s very simple and gives you a much clearer view of the whole process.
This sample project can be downloaded here.
Tuesday, June 26, 2007
ListBox - Select Multiple Items
I've seen quite a number of forums posts asking how to get the selected items of a listbox when the listbox selection mode has been changed to allow for multiple items to be selected. It's actually pretty simple to do in .net.
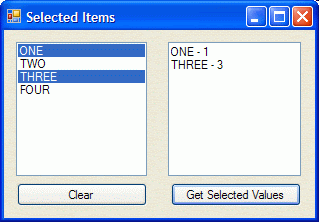 What you need to do is to loop through the SelectedItems collection to get to the items that have been selected. The list box also has a property called SelectedIndices that you can use.
Download the zip file to see the sample code on this which also shows you how to add a name-value pair item like we used to do in VB6.
 What you need to do is to loop through the SelectedItems collection to get to the items that have been selected. The list box also has a property called SelectedIndices that you can use.
Download the zip file to see the sample code on this which also shows you how to add a name-value pair item like we used to do in VB6.
Thursday, June 21, 2007
Using Meta Tags
Web pages are only useful if you have people accessing them. People only come to your site if they know how to get to it. If your site isn't well established then you need to depend on search engines to advertise your pages to the rest of the world. One way of doing that is through the use of Meta Tags.
Most web developers are too focused on creating the page content, they often overlook Meta Tags. Here, I'll discuss some of the commonly used Meta tags.
Description Meta tag describes what the page or site is about. The syntax for this is:
<Meta Name="Description" Content="Page description">
Keywords Meta tag contains the keywords that would be relevant to the page/site. For example:
<Meta Name="Keywords" Content="Web, Programming, Blog">
Description & Keywords often go hand in hand. You could apply this at the site level (all pages have the same descriptions & keywords) or at the page level (all pages have different descriptions and keywords). I’ll talk more about this in search engine ranking blog.
Author Meta contains the name of the person who published the page:
<Meta Name="Author" Content="Brian Dao">
Revisit-After Meta tag tells the web crawlers or spiders to revisit the page after certain period has passed.
<Meta Name="Revisit-After" Content="7 days">
Robots Meta tag can instruct the crawlers to index the page and whether to follow the links found on the site or not:
<Meta Name="Robots" Content="index, follow">
These are just a few things you can do to help published your webpages and get them indexed with the search engines and not optimizing your site for better ranking in search engine index as I'll talk about that in another blog.
Most web developers are too focused on creating the page content, they often overlook Meta Tags. Here, I'll discuss some of the commonly used Meta tags.
Description Meta tag describes what the page or site is about. The syntax for this is:
<Meta Name="Description" Content="Page description">
Keywords Meta tag contains the keywords that would be relevant to the page/site. For example:
<Meta Name="Keywords" Content="Web, Programming, Blog">
Description & Keywords often go hand in hand. You could apply this at the site level (all pages have the same descriptions & keywords) or at the page level (all pages have different descriptions and keywords). I’ll talk more about this in search engine ranking blog.
Author Meta contains the name of the person who published the page:
<Meta Name="Author" Content="Brian Dao">
Revisit-After Meta tag tells the web crawlers or spiders to revisit the page after certain period has passed.
<Meta Name="Revisit-After" Content="7 days">
Robots Meta tag can instruct the crawlers to index the page and whether to follow the links found on the site or not:
<Meta Name="Robots" Content="index, follow">
These are just a few things you can do to help published your webpages and get them indexed with the search engines and not optimizing your site for better ranking in search engine index as I'll talk about that in another blog.
Tuesday, June 12, 2007
Changing IP on Cisco/ProCurve Switch
Let's say we have the IP address 10.10.10.1/24 assigned to vlan 1 and want to change it to 10.10.10.2. On a Cisco switch, you can telnet in and send these commands to the switch:
conf t
interface vlan 1
ip address 10.10.10.2 255.255.255.0
conf t
interface vlan 1
ip address 10.10.10.2 255.255.255.0
The Cisco switch will update the IP address and disconnect your session. On a ProCurve switch, if you issue the same commands it will spit out an error saying:
"The IP address (or subnet) 10.10.10.2/24 already exists."
If you were going through the console port, you can set the new IP using the following commands:
conf t
vlan 1
no ip address 10.10.10.1/24
ip address 10.10.10.2/24
However, you can't do that if you connect to the switch remotely. As soon as the "no ip address" command is received and processed by the switch, your session will be disconnected and you won't be able to get to the switch. The trick to get around this issue is to make this IP address change through the switch's built-in menu system instead of using the plain old CLI.
1. Type "menu", hit Enter
2. Select "Switch Configuration"
3. Select "IP Configuration"
4. Navigate to Edit, hit Enter
5. Change the IP and then Save
You will be disconnected once you save it but you will be able to reconnect using the new IP.
Cisco Switch - TFTP IOS Upgrade
Update, Copy, Backup, Restore IOS and startup-config are pretty much done in the same manner. First, you've got to configure the switch and the PC to talk then run the TFTP or FTP server and start the copy process.
Let's walk though how you can update Cisco IOS on a 6500.
Router> enable
Router# configure terminal
Router(config)# interface gig 9/1
Router(config-int)# switchport
Router(config-int)# switchport mode access
Router(config-int)# switchport access vlan 1
Router(config-int)# no shutdown
Router(config-int)# exit
At this point, we have turn port 9/1 into a layer 2 port on vlan 1. Now we need to assign an ip address to this default vlan so we can communicate to it.
Router(config)# interface vlan 1
Router(config-int)# ip address 10.10.10.1 255.255.255.0
Router(config-int)# no shutdown
Router(config-int)# exit
 The next thing we need to do is to configure the network adapter on your PC or laptop and give it an address that's on the same network as the switch. In this case, I set it to be 10.10.10.2 255.255.255.0.
Plug in the cable from the PC to the port we just configured; and to make sure the PC can talk to the 6500 we can try pinging it:
Router(config)# do ping 10.10.10.2
If you have a successful ping reply then you should be good to go. Launch the TFTP server and start the copy process. To copy from data from TFTP server to the switch use:
Router# copy tftp: disk0:
After you issue either of this command, you will be prompted for the FTFP server address and filename. Enter 10.10.10.2 and the filename you want to copy, then confirm it to start the copy process.
And to copy data from flash to FTFP server use the command:
Router# copy disk0: tftp:
If you are copying a rather large file then you should use FTP instead of TFTP and issue the command:
Router# copy FTP: Disk0:
I have run into some issue while moving a large file to the Cisco 6509. See this blog for more details.
Let's walk though how you can update Cisco IOS on a 6500.
Router> enable
Router# configure terminal
Router(config)# interface gig 9/1
Router(config-int)# switchport
Router(config-int)# switchport mode access
Router(config-int)# switchport access vlan 1
Router(config-int)# no shutdown
Router(config-int)# exit
At this point, we have turn port 9/1 into a layer 2 port on vlan 1. Now we need to assign an ip address to this default vlan so we can communicate to it.
Router(config)# interface vlan 1
Router(config-int)# ip address 10.10.10.1 255.255.255.0
Router(config-int)# no shutdown
Router(config-int)# exit
 The next thing we need to do is to configure the network adapter on your PC or laptop and give it an address that's on the same network as the switch. In this case, I set it to be 10.10.10.2 255.255.255.0.
Plug in the cable from the PC to the port we just configured; and to make sure the PC can talk to the 6500 we can try pinging it:
Router(config)# do ping 10.10.10.2
If you have a successful ping reply then you should be good to go. Launch the TFTP server and start the copy process. To copy from data from TFTP server to the switch use:
Router# copy tftp: disk0:
After you issue either of this command, you will be prompted for the FTFP server address and filename. Enter 10.10.10.2 and the filename you want to copy, then confirm it to start the copy process.
And to copy data from flash to FTFP server use the command:
Router# copy disk0: tftp:
If you are copying a rather large file then you should use FTP instead of TFTP and issue the command:
Router# copy FTP: Disk0:
I have run into some issue while moving a large file to the Cisco 6509. See this blog for more details.
Subscribe to:
Posts (Atom)