Friday, June 29, 2007

Reading XML File Using XMLTextReader

System.XML namespace provides us with the XMLTextReader class which we could use to read and process XML files.

The most commonly used attributes are .Name and .Value which returns information of about the elements and their associated information.

MoveToNextAttribute method is used to navigate to the next element. The project below uses an OpenFileDialog box to get the XML file which is then passed to XMLTextReader object and open it. Then the Read method is called to read in and processed the entire XML file and put its content into a textbox.

In my opinion, reading XML this way is rather confusing. I like reading XML file using XMLDocument object better as it’s very simple and gives you a much clearer view of the whole process.

This sample project can be downloaded here.

Tuesday, June 26, 2007

ListBox - Select Multiple Items

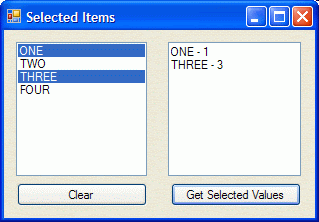
I've seen quite a number of forums posts asking how to get the selected items of a listbox when the listbox selection mode has been changed to allow for multiple items to be selected. It's actually pretty simple to do in .net.

What you need to do is to loop through the SelectedItems collection to get to the items that have been selected. The list box also has a property called SelectedIndices that you can use.

Download the zip file to see the sample code on this which also shows you how to add a name-value pair item like we used to do in VB6.

Thursday, June 21, 2007

Using Meta Tags

Web pages are only useful if you have people accessing them. People only come to your site if they know how to get to it. If your site isn't well established then you need to depend on search engines to advertise your pages to the rest of the world. One way of doing that is through the use of Meta Tags.

Most web developers are too focused on creating the page content, they often overlook Meta Tags. Here, I'll discuss some of the commonly used Meta tags.

Description Meta tag describes what the page or site is about. The syntax for this is:

<Meta Name="Description" Content="Page description">

Keywords Meta tag contains the keywords that would be relevant to the page/site. For example:

<Meta Name="Keywords" Content="Web, Programming, Blog">

Description & Keywords often go hand in hand. You could apply this at the site level (all pages have the same descriptions & keywords) or at the page level (all pages have different descriptions and keywords). I’ll talk more about this in search engine ranking blog.

Author Meta contains the name of the person who published the page:

<Meta Name="Author" Content="Brian Dao">

Revisit-After Meta tag tells the web crawlers or spiders to revisit the page after certain period has passed.

<Meta Name="Revisit-After" Content="7 days">

Robots Meta tag can instruct the crawlers to index the page and whether to follow the links found on the site or not:

<Meta Name="Robots" Content="index, follow">

These are just a few things you can do to help published your webpages and get them indexed with the search engines and not optimizing your site for better ranking in search engine index as I'll talk about that in another blog.

Tuesday, June 12, 2007

Changing IP on Cisco/ProCurve Switch

Let's say we have the IP address 10.10.10.1/24 assigned to vlan 1 and want to change it to 10.10.10.2. On a Cisco switch, you can telnet in and send these commands to the switch:

conf t
interface vlan 1
ip address 10.10.10.2 255.255.255.0

The Cisco switch will update the IP address and disconnect your session. On a ProCurve switch, if you issue the same commands it will spit out an error saying:

"The IP address (or subnet) 10.10.10.2/24 already exists."

If you were going through the console port, you can set the new IP using the following commands:

conf t
vlan 1
no ip address 10.10.10.1/24
ip address 10.10.10.2/24

However, you can't do that if you connect to the switch remotely. As soon as the "no ip address" command is received and processed by the switch, your session will be disconnected and you won't be able to get to the switch.

The trick to get around this issue is to make this IP address change through the switch's built-in menu system instead of using the plain old CLI.

1. Type "menu", hit Enter
2. Select "Switch Configuration"
3. Select "IP Configuration"
4. Navigate to Edit, hit Enter
5. Change the IP and then Save

You will be disconnected once you save it but you will be able to reconnect using the new IP.

Cisco Switch - TFTP IOS Upgrade

Update, Copy, Backup, Restore IOS and startup-config are pretty much done in the same manner. First, you've got to configure the switch and the PC to talk then run the TFTP or FTP server and start the copy process.

Let's walk though how you can update Cisco IOS on a 6500.

Router> enable
Router# configure terminal
Router(config)# interface gig 9/1
Router(config-int)# switchport
Router(config-int)# switchport mode access
Router(config-int)# switchport access vlan 1
Router(config-int)# no shutdown
Router(config-int)# exit

At this point, we have turn port 9/1 into a layer 2 port on vlan 1. Now we need to assign an ip address to this default vlan so we can communicate to it.

Router(config)# interface vlan 1
Router(config-int)# ip address 10.10.10.1 255.255.255.0
Router(config-int)# no shutdown
Router(config-int)# exit


The next thing we need to do is to configure the network adapter on your PC or laptop and give it an address that's on the same network as the switch. In this case, I set it to be 10.10.10.2 255.255.255.0.

Plug in the cable from the PC to the port we just configured; and to make sure the PC can talk to the 6500 we can try pinging it:

Router(config)# do ping 10.10.10.2

If you have a successful ping reply then you should be good to go. Launch the TFTP server and start the copy process. To copy from data from TFTP server to the switch use:

Router# copy tftp: disk0:

After you issue either of this command, you will be prompted for the FTFP server address and filename. Enter 10.10.10.2 and the filename you want to copy, then confirm it to start the copy process.

And to copy data from flash to FTFP server use the command:

Router# copy disk0: tftp:

If you are copying a rather large file then you should use FTP instead of TFTP and issue the command:

Router# copy FTP: Disk0:

I have run into some issue while moving a large file to the Cisco 6509. See this blog for more details.
Monday, June 11, 2007

ProCurve Switch - TFTP Flash Update

To update the IOS on the HP's ProCurve switches you first need to configure an access port so it can communicate to the TFTP Server.

ProCurve Switch 3500yl-48G> enable
ProCurve Switch 3500yl-48G# configure terminal
ProCurve Switch 3500yl-48G(config)# vlan 1
ProCurve Switch 3500yl-48G(vlan-1)# ip address 10.10.10.1/24
ProCurve Switch 3500yl-48G(vlan-1)# exit

Next, you will need to configure the network adapter on your PC or laptop and give it an address that's on the same network as the switch. In this case, I set it to be 10.10.10.2 255.255.255.0.

Then the next step is to connect your machine to the switch; plug a cable from your laptop or PC to the switch. And just to make sure that the data can travel from one end to another, we'll go ahead and try to send a ping to the server:

ProCurve Switch 3500yl-48G# ping 10.10.10.2

If the ping is successful, you need to launch your TFTP Server, then you can go ahead and update the flash by issuing the copy command and pass to it the server address and the filename:

ProCurve Switch 3500yl-48G# copy tftp flash 10.10.10.2 k_12_02.swi

And if you need to update the secondary flash, then issue this command:

ProCurve Switch 3500yl-48G# copy tftp flash 10.10.10.2 k_12_02.swi secondary

I make a habit of using scripts to make the whole process easier to manage and make the update faster so here's the entire script:

enable
configure terminal
vlan 1
no ip add
ip address 10.10.10.1/24
exit
ping 10.10.10.2
copy tftp flash 10.10.10.2 k_12_02.swi
y
copy tftp flash 10.10.10.2 k_12_02.swi secondary
y


Note: If you use this script, make sure that you update the ip address and change the filename.

Programmatically Add Event Handlers to Controls At Runtime

If you have read my previous blogs, you'll see that I have discussed about how to add and remove controls at run time. Some controls created at runtime are pretty much useless if they have no event handlers attached to them.

What are event handlers? Think of event handlers as actions that are bound to controls. What action(s) would you want to carry out when certain things happen (ie: like a button is clicked, doubleclicked…)?

Let take a look at the following lines of code:

Dim newButton as Windows.Forms.Button
Dim i As Integer
For i = 1 To 5
newButton = New Windows.Forms.Button
newButton.Name = "btnButton" & i
newButton.Text = "Button " & i
newButton.Top = 20 + i * 30
newButton.Left = 40
Me.Controls.Add(newButton)
Next

The code block above will add 5 buttons to the form at runtime. But when you click on the buttons, nothing happen. Why? This is because at this time, there are no event handlers attached to the buttons.

Let make some modifications:

Public WithEvents newButton As Windows.Forms.Button
Private Sub Form1_Load(ByVal sender As Object, ByVal e As System.EventArgs) Handles Me.Load
Dim i As Integer
For i = 1 To 5
newButton = New Windows.Forms.Button
newButton.Name = "btnButton" & i
newButton.Text = "Button " & i
newButton.Top = 20 + i * 30
newButton.Left = 40
AddHandler newButton.Click, AddressOf ButtonClicked
Me.Controls.Add(newButton)
Next
End Sub

Private Sub ButtonClicked(ByVal sender As Object, ByVal e As EventArgs)
MsgBox("You clicked: " & sender.name &amp;amp; vbCrLf & "Button name: " & sender.Text)
End Sub

Here the newButton has been redefined as a control with events and the AddHandler call attached the method ButtonClicked to the Click event of the control. Note that the control is declared as a global variable. You can’t declare a control with events as a local variable. The address of ButtonClick method is then bound or attached to newButton’s click event. Any time the button is clicked, ButtonClicked method will run and a message box will be displayed.

As you can see, it's pretty straight forward to add, remove and attached events to controls that are created on the fly. This blog only scratches the surface of these issues. You can further your study from these links:

Delegates and the AddressOf Operator
Events and Event Handlers

Download sample code: EventHandlers.zip

Sunday, June 10, 2007

Programmatically Remove Controls At Runtime

In the last blog, I discussed about how to programmatically add controls at runtime. This blog, we'll do just the opposite of that - removing controls programmatically.

The Controls collection offers a few methods that we can use to remove controls at runtime (Clear, Remove, RemoveAt).

Be careful when you call Remove or RemoveAt method though, as the Count property as well as the collection will be updated instantaneously and might produce undesirable result. Consider the following code snippet:

Dim i as Integer
With Me.Controls
For i = 0 to .Count - 1
If TypeOf .Item(i) is CheckBox Then
.RemoveAt(i)
Next
End With


This will work just fine if you have only one checkbox. However, if you have more than one checkboxes on the form, then it will remove every other one as the control collection is updated as soon as a control is removed resulting in a change in the Count property which messes things up and eventually throw an index out of range error.

To work around this, we'll have to remove the controls from the high end of the Count property as follow:

Dim i as Integer
With Me.Controls
For i = .Count - 1 To 0 Step -1
If TypeOf .Item(i) is CheckBox Then
.RemoveAt(i)
Next
End With


You can download the code for this blog here.


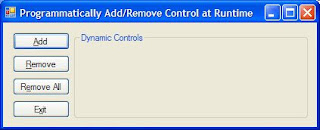
Programmatically Add Controls At Runtime

As I have experienced it, in some situations, you might not know the types of control or how many controls will be needed at design time. In these cases, you'd have to create the controls programmatically and dynamically add them to the form at runtime.

Adding controls at runtime is pretty simple:

Dim newControl as New Windows.Forms.CheckBox
newControl.Name = "chkCheckAll"
newControl.Text = "check all"
newControl.Top = 10
newControl.Left = 10me.Controls.Add(newControl)

The code snippet above will declare a checkbox and add it to the current form.

If you don't know the type of control then it'd be best to declare the new control as a generic control and then later modify to suite your need.

Dim newControl as Windows.Forms.Control
If createCheckBox Then
newControl = New Windows.Forms.CheckBox
Else
newControl = New Windows.Forms.RadioButton
End If

I find the .Tag property particularly helpful when working with controls dynamically. You can use it to store specific information about the control and you it later on when you process the control.

This blog only touches some of the properties for CheckBox & RadioButton as I try to keep the blog short. You should further explore their other properties to gain more understanding about them.

Now that you know how to add controls at runtime, let's see how you can programmatically remove them.

Friday, June 8, 2007

Cisco TFTP - Flash Update Problem

I was upgrading the IOS for the Cisco 6509s. I got Cisco TFTP Server setup and connected to it to download the file. The file was around 80Mb. TFTP Server threw an exception and shutdown. Upon restart, the file started to get downloaded but a few seconds later Cisco TFTP Server threw another error. This time I was able to view the error message and it said the transfer failed due to Synchronization Error.

I switched to SolarWinds TFTP Server and got a more detailed error saying the file was too large to be transferred through TFTP.

As an alternative, I used FTP Server from 3CDaemon and issued the command:

copy FTP: Disk0:

and it worked like a champ.

I had IIS running on my laptop so I turned off 3CDaemon and used IIS's FTP server. It worked out just fine.

So if you are transferring a large file you should use FTP and not TFTP to avoid potential problems and I also recommend 3CDaemon as it's got TFTP Server, FTP Server, Syslog as well as TFTP client all in one package.

Date Delimiter for Access and SQL Server

Microsoft's two most popular databases (MS Access & MS SQL Server) implement date delimiter differntly. This makes it hard to write queries that are compatible with both.

What I normally do this in situation would be creating a flag to indicate which database is being used and use the appropriate delimiter as follow:

Dim bAccessInUse As Boolean
Dim sSql As String

Function DateOut(byVal TheDate as String) as String
If bAccessInUse Then

Return "#" & TheDate & "#"
Else Return "'" & TheDate & "'"
End If
End Function

sSQL = "Select * From tablename Where date_col=" & DateOut(the_date)

If you use this function throughout your code and set and the flag by checking the connection string, you should have no problem making it run against either database without any modification.

Simple Way To Add Watermark

Here's a pretty simple way to add watermark to your image in VB6.

Private Sub Form_Load()
Dim Message As String
With Picture1
.AutoRedraw = True
With .Font
.Name = "Arial"
.Size = 18
.Bold = True
End With
Message = "Hello World"
.CurrentX = (.Width - .TextWidth(Message)) / 2
.CurrentY = (.Height - .TextHeight(Message)) / 2
End With
Picture1.Print Message
End Sub

File System Object

The FileSystemObject object library, which is part of the Microsoft Scripting Runtime library (Scrrun.dll) provides an object-oriented approach to directories & files manipulation. For instance, system folder creation and deletion is one common task your code will need to perform. Naturally, before you attempt to either create or delete a folder, your procedure will want to determine if it exists. The FileSystemObject library provides the perfect solution.

First, you'll need to set a project reference to the Scrrun.dll. The FileSystemObject is the top-level object within the file hierarchy, and you create an instance of it just like you would with any other object variable:

VB6

Set oFSO = New Scripting.FileSystemObject

ASP

Set oFSO = Server.CreateObject("Scripting.FileSystemObject")

The FolderExists() method returns True if the folder exists and False if not. The CreateFolder() and DeleteFolder() methods create and delete folders respectively. All three of these methods require the full path to the folder in question. The following code shows how to use these methods (assuming you've set a reference to the Microsoft Scripting Runtime library):

If Not oFSO.FolderExists("C:\Test") Then
Call oFSO.CreateFolder "C:\Test"
End If
Call oFSO.DeleteFolder "C:\Test"
Set oFSO = Nothing